Understanding Vapor Barrier Installation
What is a Vapor Barrier?
A vapor barrier is a material designed to prevent moisture from passing through walls, floors, and ceilings, thereby protecting your home from unwanted dampness and mold. These barriers are typically installed in basements, crawl spaces, and other areas prone to high humidity. Made from materials like polyethylene plastic, vapor barriers are essential for maintaining a healthy indoor environment. When installed correctly, a vapor barrier can greatly reduce the risk of moisture-related issues in your home.
Importance of Vapor Barrier Installation
Vapor barriers play a crucial role in energy efficiency and overall home health. Without proper installation, moisture can lead to structural damage, mold growth, and poor indoor air quality. A well-fitted vapor barrier can help keep your home dry, reducing energy costs by preventing air leaks that occur due to temperature differences inside and outside your home. In climates with high humidity, the significance of a vapor barrier is heightened, rendering it a necessity rather than an option.
Common Materials Used
The most common material for vapor barriers is polyethylene plastic, which comes in various thicknesses, typically ranging from 6 to 20 mils. The thicker the barrier, the more effective it tends to be at preventing moisture infiltration. Alternative materials may include reinforced foil and bituminous membranes, often used in commercial applications for their enhanced durability. Understanding the materials available is critical for selecting the right vapor barrier suited to your specific environment and requirements.
Preparing for Vapor Barrier Installation
Assessing Your Crawl Space
Before diving into installation, a thorough assessment of your crawl space is necessary. Check for existing moisture issues, mold growth, or standing water, as these can affect the effectiveness of your vapor barrier. Additionally, assess the condition of insulation, vents, and the overall accessibility of the crawl space. Identifying these variables will influence your vapor barrier choice and installation strategy. Consider documenting your findings to ensure all problematic areas are addressed appropriately.
Selecting the Right Material
Choosing the right material for your vapor barrier is essential for optimal performance. Thicker barriers (15 mils and up) tend to offer greater durability and moisture resistance, especially in areas with high humidity or where water intrusion is a concern. Ensure that the material is puncture-resistant and includes UV stabilizers if it will be exposed to sunlight for any period. Review product specifications and consult resources, including Vapor Barrier Installation guidelines to ensure the selected material meets local building code requirements.
Safety Precautions Before Installation
Before starting the installation, ensure that you take necessary safety precautions. Wear protective clothing, gloves, and a mask to prevent inhalation of dust or mold spores. If your crawl space has significant mold or mildew, consider hiring a professional for remediation before proceeding with installation. Additionally, ensure proper ventilation in the workspace and use appropriate tools to maintain safety during the installation process.
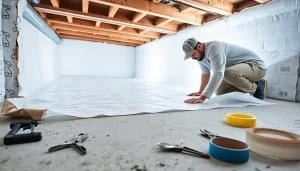
Step-by-Step Guide to Vapor Barrier Installation
Cleaning the Crawl Space
Start your installation by thoroughly cleaning the crawl space. Remove any debris, leaves, or insulation that may impede the vapor barrier. Address moisture issues first: if standing water is present, pump it out and let the area dry adequately. Once the space is clear, inspect for any signs of pest infestation or additional damage. A clean and dry surface is crucial for the successful adherence of the vapor barrier.
Measuring and Cutting the Vapor Barrier
After cleaning, accurately measure the dimensions of your crawl space. This will allow you to determine the amount of vapor barrier material needed. Using a sharp utility knife or scissors, cut the vapor barrier to size, ensuring each section overlaps by at least 12 inches where multiple sheets are used. Allow for additional material around edges to facilitate secure anchoring.
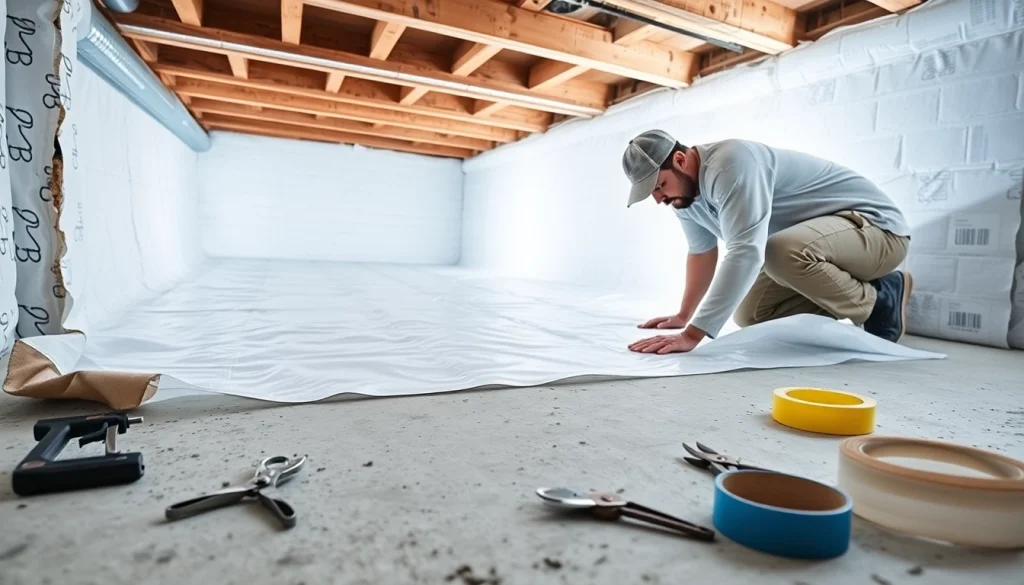
Securing and Finishing the Installation
Begin securing the vapor barrier by laying the first sheet flat on the ground. Use construction adhesive or specialized vapor barrier tape at seams and edges to create an air-tight seal. If your barrier extends up walls, use additional tape or fasteners to secure the material to the foundation. Ensure the barrier is installed tightly against the ground to minimize wrinkles and avoid moisture entry points. Finally, conduct a thorough inspection after installation to ensure all seams are tightly sealed and there are no visible gaps.
Maintaining Your Vapor Barrier
Regular Inspections and Repairs
Post-installation, regular inspections of your vapor barrier are vital. It’s recommended to inspect at least once a year, and more frequently in areas prone to moisture. Look for signs of damage, such as tears or punctures, and make necessary repairs immediately to avoid further issues. Ensure that no plants or debris obstruct the barrier, as this can lead to moisture buildup. Keeping a maintenance log can help you track the condition of the vapor barrier over time.
Signs of Damage
Recognizing the signs of damage can save time and money in the long run. Look for visual indicators such as mold growth on the barrier, pooling water, or increased pest activity in the crawl space. Additionally, pay attention to any changes in indoor air quality or humidity levels. If you notice any of these signs, take action promptly to assess the barrier’s integrity and determine if repairs are necessary.
Improving Crawl Space Ventilation
While the vapor barrier acts as a moisture control element, proper ventilation of your crawl space is equally essential. Consider installing vents or mechanical ventilation systems to facilitate airflow. Use exhaust fans or dehumidifiers where needed to ensure a dry environment. By improving ventilation, you can further enhance the effectiveness of your vapor barrier while minimizing the potential for moisture buildup.
FAQs about Vapor Barrier Installation
How long does a vapor barrier last?
A vapor barrier can last from 10 to 20 years if properly installed and maintained. Regular inspections will help extend its lifespan.
Can I install a vapor barrier myself?
Yes, with the right tools and instructions, many homeowners successfully install vapor barriers themselves. Make sure to follow a proper guide for best results.
What thickness is recommended for vapor barriers?
Typically, a thickness of at least 6 mils is recommended for effective vapor resistance. Thicker barriers may be needed for high moisture areas.
How does a vapor barrier prevent moisture?
A vapor barrier blocks moisture from soil or groundwater from penetrating into your home, thereby reducing humidity and preventing damage.
Is a vapor barrier necessary in all climates?
While essential in humid climates, it can also be beneficial in various scenarios, including cold areas to prevent condensation and dampness.